Blog
Understanding ISO, Shutter Speed, and Aperture for Better Photos
Understanding ISO, Shutter Speed, and Aperture for Better Photos
In photography, three essential settings—ISO, shutter speed, and aperture—work together to determine the exposure of your images. Whether you’re a beginner or an experienced photographer, understanding how each of these elements functions is key to taking better photos. Known as the “exposure triangle,” these three settings control the amount of light that hits your camera sensor, and mastering them will allow you to have full control over the final look of your photos.
In this article, we’ll break down ISO, shutter speed, and aperture, how they affect your images, and how you can adjust them to improve your photography skills.
1. ISO: The Sensitivity of Your Camera’s Sensor
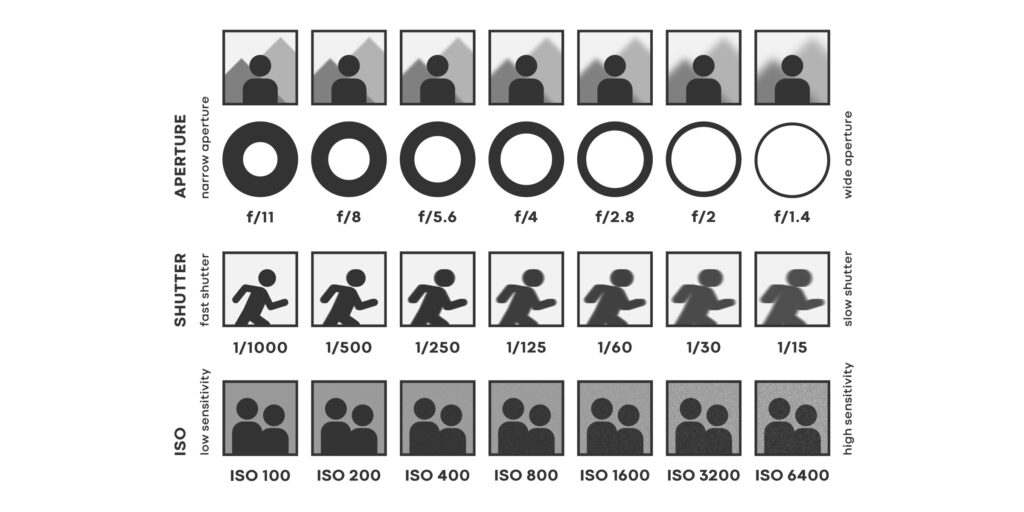
ISO refers to the sensitivity of your camera’s sensor to light. In simple terms, it determines how much light the camera needs to create an image. A lower ISO setting (e.g., 100 or 200) means less sensitivity, which is ideal for well-lit conditions, while a higher ISO (e.g., 1600 or 3200) increases sensitivity, allowing you to capture photos in low-light situations.
- How ISO Affects Your Photos:
- Low ISO (100-400): A lower ISO setting is ideal for bright environments or when you are shooting outdoors in daylight. It produces the clearest, sharpest images with minimal noise (grain).
- High ISO (800 and above): Higher ISO settings are useful in low-light environments, such as indoor events or nighttime photography. However, increasing ISO can introduce digital noise (grain) into your photos, making them appear less sharp and clean.
- When to Use High ISO:
- In dimly lit environments, such as indoors, at night, or in concert halls, a higher ISO will help you capture images without requiring excessively long shutter speeds.
- When to Use Low ISO:
- Outdoors in bright daylight or well-lit scenes, where you want to capture maximum detail and sharpness in your photos without introducing noise.
![]()
2. Shutter Speed: The Duration of Light Exposure
Shutter speed refers to how long the camera’s shutter is open to allow light to hit the camera’s sensor. It is measured in fractions of a second (e.g., 1/1000, 1/500, 1/60) or full seconds (e.g., 1″, 2″, 5″). Shutter speed plays a crucial role in how motion is captured and how much light enters the camera.
- How Shutter Speed Affects Your Photos:
- Fast Shutter Speed (1/500, 1/1000, 1/2000): A fast shutter speed freezes motion, making it ideal for action shots like sports, wildlife, or any fast-moving subject. It allows less light to hit the sensor, which is why fast shutter speeds are often paired with higher ISO settings in low light.
- Slow Shutter Speed (1/30, 1/15, 1/4, 1″, 5″): A slow shutter speed captures motion blur, making it perfect for creating artistic effects, such as capturing the smooth flow of water, light trails, or nighttime cityscapes. Slow shutter speeds require either a tripod or very steady hands to prevent camera shake, as any movement can blur the image.
- When to Use Fast Shutter Speeds:
- In bright conditions or when photographing fast-moving subjects such as athletes or animals. A fast shutter speed freezes motion, preventing blur.
- When to Use Slow Shutter Speeds:
- When you want to capture motion, like light trails or waterfalls, or when you’re shooting in low-light conditions but want to allow more time for light to reach the sensor.
3. Aperture: The Size of the Lens Opening
Aperture refers to the size of the opening in your lens through which light passes to reach the sensor. It is measured in f-stops (e.g., f/1.4, f/2.8, f/5.6, f/16). A wider aperture (represented by a lower f-number) allows more light into the camera, while a smaller aperture (higher f-number) lets in less light.
- How Aperture Affects Your Photos:
- Wide Aperture (f/1.4, f/2.8, f/4): A wide aperture allows more light to enter the lens, making it ideal for low-light situations or when you need to use faster shutter speeds. Additionally, wide apertures create a shallow depth of field, which blurs the background and makes the subject stand out. This is why wide apertures are often used in portrait photography to achieve a “bokeh” effect.
- Small Aperture (f/8, f/16): A small aperture lets in less light but increases the depth of field, meaning more of the scene will be in focus. Smaller apertures are typically used in landscape photography or situations where you want both the foreground and background to appear sharp.
- When to Use a Wide Aperture:
- In low-light conditions or when you want a blurry background (such as in portraits or macro photography) to make your subject stand out.
- When to Use a Small Aperture:
- For landscapes or architecture shots where you need both the foreground and background to be in focus, or when shooting in bright daylight.
4. How ISO, Shutter Speed, and Aperture Work Together
The key to mastering photography is understanding how these three elements interact with each other. Together, they form the exposure triangle, and changing one setting will often require adjusting one or both of the other settings to maintain the correct exposure.
- For Example:
- If you want a fast shutter speed to freeze motion (e.g., 1/1000), you’ll need to either open the aperture (use a wider f-number) or raise the ISO to compensate for the reduced amount of light hitting the sensor.
- If you’re shooting in low light and increase the ISO to maintain a proper exposure, you may also need to adjust your aperture (wider) or shutter speed (slower) to prevent overexposure or noise.
5. Balancing the Exposure Triangle: Practical Tips
To get better photos, you need to balance ISO, shutter speed, and aperture to achieve the right exposure. Here are some practical tips for finding that balance:
- Use the Camera’s Metering System: Most cameras have a built-in metering system that helps you determine the proper exposure. When your camera displays a reading of 0 on the exposure meter, it indicates that your image is properly exposed.
- Consider Your Subject and Scene: The type of photo you’re trying to take will often dictate how you adjust the exposure triangle. For example:
- Portraits: Use a wide aperture (e.g., f/2.8) for a shallow depth of field and a blurred background. You may need to adjust ISO and shutter speed to maintain a correct exposure.
- Action Shots: Use a fast shutter speed (e.g., 1/1000 or faster) to freeze the motion, and compensate with a wider aperture or higher ISO if necessary.
- Landscapes: Use a small aperture (e.g., f/8 to f/16) for greater depth of field, and adjust shutter speed and ISO for correct exposure.
- Use Manual Mode: If you want full control over your exposure, shoot in manual mode (M) on your camera. This mode allows you to adjust all three settings to get the desired effect. Use the camera’s histogram to help you assess whether the image is overexposed or underexposed.
6. Conclusion
Mastering the relationship between ISO, shutter speed, and aperture is essential to becoming a better photographer. By understanding how each of these settings affects your photos and learning how to balance them, you’ll be able to take control of your exposure and capture the perfect image every time. Whether you’re shooting in bright daylight, low light, or capturing motion, applying these settings thoughtfully will elevate your photography to the next level.
Remember, photography is an art form, and while the exposure triangle provides a technical foundation, it’s your creativity and understanding of these tools that will allow you to create stunning images. Happy shooting!


